

Abstract
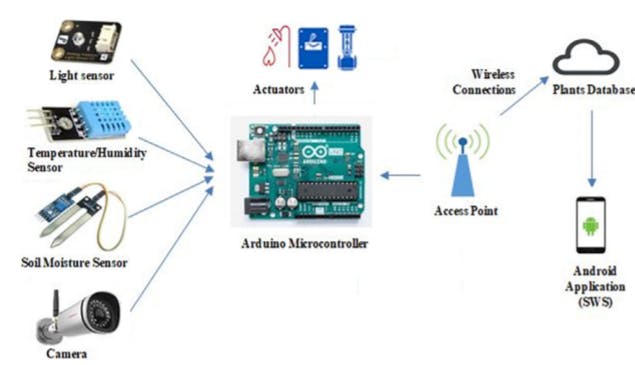
An intelligent Smart Watering System (SWS) is assisted with an Android application for smart consumption of water in small are medium-scale garden and fields. The proposed system banks on a set of accessible and economical sensors that capture real-time data of plants and environment conditions such as Soil Moisture Level, Light Intensity, air humidity, air temperature, etc. Once the data is collected from sensors on a server, the proposed SWS processes the data to decide about the watering schedule. Here, It helps in taking smart decisions with respect to watering requirements in IoT and manage the proposed SWS. In our approach. The multiple users and devices can be involved in monitoring and interacting remotely with plants by using Smart Watering System (SWS) (prototype) application that is developed in Android. On the bases of values of the input variables, the SWS activates the actuators to take watering actions such as turning water tunnels ON/OFF in periodical manner. The results of the proposed system show that it is efficient and secure application to efficiently handle the watering process of plants.
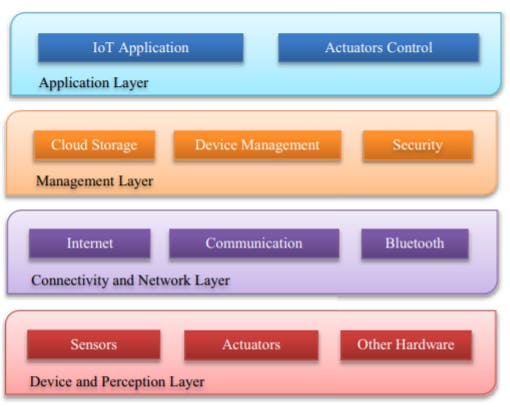
Architecture of smart watering system
The proposed system has four layers as shown in Fig. These four layers of proposed Smart Watering System are Application layer, Management layer, Network and Connectivity layer and Device and Perception layer. All these layers interact with each other to provide a secure communication in devices and sensors for seamless working of the proposed smart watering system.
Implementation of smart watering system
Following is the list of the hardware devices and sensors that are used in the implementation of the proposed Smar tWatering System (SWS):
- Arduino-UNO R3(Arduino Nightly)
- Bread Board
- 12v Water Pump
- 5v Relay
- Wi-Fi Module ESP 8266–01
- Standard wires and jumpers
- Ambient Light sensor
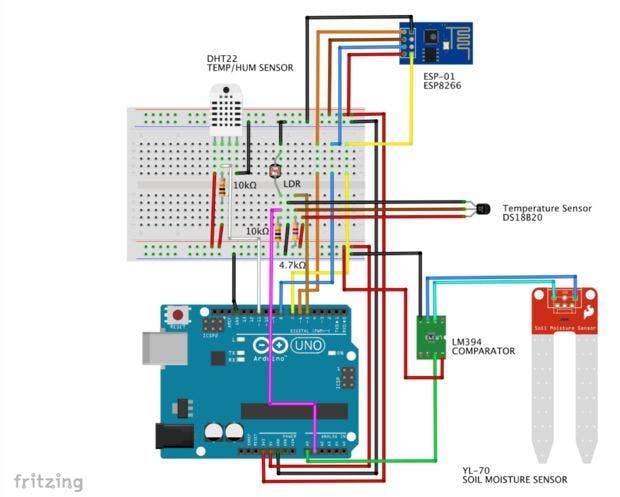
- DHT-11 Temperature & Humidity sensor(CKt diagram consists of DHT 22 you can replace it wit DHT 11 sensor)
- YL-69 Soil Moisture Sensor
The below picture represents the circuit diagram
Code for sensor testing
#define SensorPin 0
     float sensorValue = 0;
     float lig = 0;
     #include <dht.h>
     #define light 1
     #define dht_apin 11 // Analog Pin sensor is connected to
    dht DHT;
    void setup() {
    Serial.begin(9600);
    delay(100);//Delay to let system boot
    Serial.println("DHT11 Humidity & temperature Sensor\n\n");
    delay(10);//Wait before accessing Sensor
    }
   void loop() {
   for (int i = 0; i <= 100; i++)
   {
   sensorValue = sensorValue + analogRead(SensorPin);
   delay(10);
   lig = lig + analogRead(light);
   }
  sensorValue = sensorValue/100;
  Serial.print("soil moisture ");
  Serial.print(" = ");
  Serial.println(sensorValue);
  Serial.println("light =");
  Serial.println(lig);
  DHT.read11(dht_apin);
    Serial.print("Current humidity = ");
    Serial.print(DHT.humidity);
    Serial.print("%  ");
    Serial.print("temperature = ");
    Serial.print(DHT.temperature);
    Serial.println("C  ");
 delay(10);
 }
Complete code of the setup
//ThingSpeak
String statusChWriteKey = "1DBVPNXIX6OBQ6PE";  // Status Channel id: 385184
String channelID = "1434440";
#include <SoftwareSerial.h>
SoftwareSerial EspSerial(6, 7); // Rx,  Tx
#define HARDWARE_RESET 8


//temperature and humidity
#include<stdlib.h>
#include "DHT.h"
#define DHTPIN 11
#define DHTTYPE DHT11
DHT dht(DHTPIN,DHTTYPE);
float temp=0;
float humid=0;

// light
#define ldrpin 1
int light=0;


//soil moisture
#define moisture 0
float soilmoisture =0;

// timer variables
long writeTimingSeconds = 17; // ==> Define Sample time in seconds to send data
long startWriteTiming = 0;
long elapsedWriteTime = 0;
long startreadTiming=0;
long readTimingSeconds = 10;//==>Define Sample tie in seconds to reciveve data
long elapsedReadTime=0;

// actuators variables
#define Actuator 10
boolean pump =0;

int spare =0;
boolean error;

void setup() {
 Serial.begin(9600);

 pinMode(Actuator,OUTPUT);
 pinMode(HARDWARE_RESET,OUTPUT);

 digitalWrite(Actuator,HIGH);
 digitalWrite(HARDWARE_RESET,HIGH);

 dht.begin();
 EspSerial.begin(9600); //Communicate com module wifi
 EspHardwareReset();//reset modukle
 startWriteTiming=millis();
 startreadTiming=millis();
 Serial.println("DHT11 Humidity & temperature Sensor\n\n");
}
void loop()
{
  start: //label
  error=0;

  elapsedWriteTime = millis()-startWriteTiming;
  elapsedReadTime = millis()-startreadTiming;

  if (elapsedReadTime > (readTimingSeconds*1000)){
    int command =readThingSpeak(channelID);
    if(command !=9) pump =command;
    takeActions();
    startreadTiming = millis();
  }

  if (elapsedWriteTime > (writeTimingSeconds*1000))
  {
    readSensors();
    writeThingSpeak();
    startWriteTiming = millis();
  }

  if (error==1) //Resend if transmission is not completed
  {
    Serial.println(" <<<< ERROR >>>>");
    delay (2000);
    goto start; //go to label "start"
  }
}
/************read sensor value*****************/

void readSensors(void){
temp = dht.readTemperature();
humid = dht.readHumidity();
soilmoisture = map(analogRead(moisture),1023,0,0,100);
light = map(analogRead(ldrpin),1023,0,0,100);
}

/************Take actions based on thingspeak commands **********/
void takeActions(void){
  Serial.print("pump: ");
  Serial.print(pump);
  if (pump==1) digitalWrite(Actuator,LOW);
  else digitalWrite(Actuator,HIGH);
}

/****************Read actuators cmd from thing speak***********/
int readThingSpeak(String channelID)
{
  startThingSpeakCmd();
  int command;
  String getStr = "GET /channels/";
  getStr += channelID;
  getStr +="/fields/1/last";
  getStr += "\r\n";

  String messageDown = sendThingSpeakGetCmd(getStr);
  Serial.print(messageDown);
  if (messageDown[5] == 49)
  {
    command = messageDown[7]-48;
    Serial.print("Command received: ");
    Serial.println(command);
  }
  else command = 9;
  return command;
}

/************COm tcp on thingspeak****************/

void writeThingSpeak(void)
{
  startThingSpeakCmd();
  String getStr = "GET /update?api_key=";
  getStr += statusChWriteKey;
  getStr +="&field1=";
  getStr += String(pump);
  getStr +="&field2=";
  getStr += String(humid);
  getStr +="&field3=";
  getStr += String(temp);
  getStr +="&field4=";
  getStr += String(soilmoisture);
  getStr +="&field5=";
  getStr += String(light);
  getStr +="&field6=";
  getStr += String(spare);
  getStr += "\r\n\r\n";
  sendThingSpeakGetCmd(getStr);
}

/********Echo Command*********/
boolean echoFind(String keyword){
 byte current_char = 0;
 byte keyword_length = keyword.length();
 long deadline = millis() + 5000;
 while(millis() < deadline){
  if (EspSerial.available()){
    char ch = EspSerial.read();
    Serial.write(ch);
    if (ch == keyword[current_char])
      if (++current_char == keyword_length){
       Serial.println();
       return true;
    }
   }
  }
 return false;
}


/*****reset esp******/
void EspHardwareReset(void)
{
  Serial.println("Reseting.......");
  digitalWrite(HARDWARE_RESET, LOW);
  delay(500);
  digitalWrite(HARDWARE_RESET, HIGH);
  delay(8000);
  Serial.println("RESET");
}

/********* Check ESP *************/
boolean ESPcheck(void)
{
  EspSerial.println("AT"); // Send "AT+" command to module

  if (echoFind("OK"))
  {
    Serial.println("ESP ok");
    return true;
  }
  else
  {

    Serial.println("ESP Freeze ******************************************************");
    EspHardwareReset();
    return false;
  }
}


/********* Start communication with ThingSpeak*************/
void startThingSpeakCmd(void)
{
  EspSerial.flush();//limpa o buffer antes de começar a gravar
  EspSerial.println("AT+RST");
  delay(6000);
  EspSerial.println("AT+CWJAP?");
  delay(6000);
  String cmd = "AT+CIPSTART=\"TCP\",\"";
  cmd += "184.106.153.149";
  cmd += "\",80";
  EspSerial.println(cmd);
  Serial.print("env ==> Start cmd: ");
  Serial.println(cmd);
  if(EspSerial.find("Error"))
  {
    EspSerial.println("AT");
    Serial.println("AT+CIPSTART error");
    return;
  }
}
/********* send a GET cmd to ThingSpeak *************/
String sendThingSpeakGetCmd(String getStr)
{
  String cmd = "AT+CIPSEND=";
  cmd += String(getStr.length());
  EspSerial.println(cmd);
  Serial.print("env ==> lenght cmd: ");
  Serial.println(cmd);

  if(EspSerial.find((char *)">"))
  {
    EspSerial.print(getStr);
    Serial.print("env ==> getStr: ");
    Serial.println(getStr);
    delay(500);


    String messageBody = "";
    while (EspSerial.available())
    {
      String line = EspSerial.readStringUntil('\n');
      if (line.length() == 1)
      { //actual content starts after empty line (that has length 1)
        messageBody = EspSerial.readStringUntil('\n');
      }
    }
    Serial.print("MessageBody received: ");
    Serial.println(messageBody);
    return messageBody;
  }
  else
  {
    EspSerial.println("AT+CIPCLOSE");     // alert user
    Serial.println("ESP8266 CIPSEND ERROR: RESENDING"); //Resend...
    spare = spare + 1;
    error=1;
    return "error";
  }
}
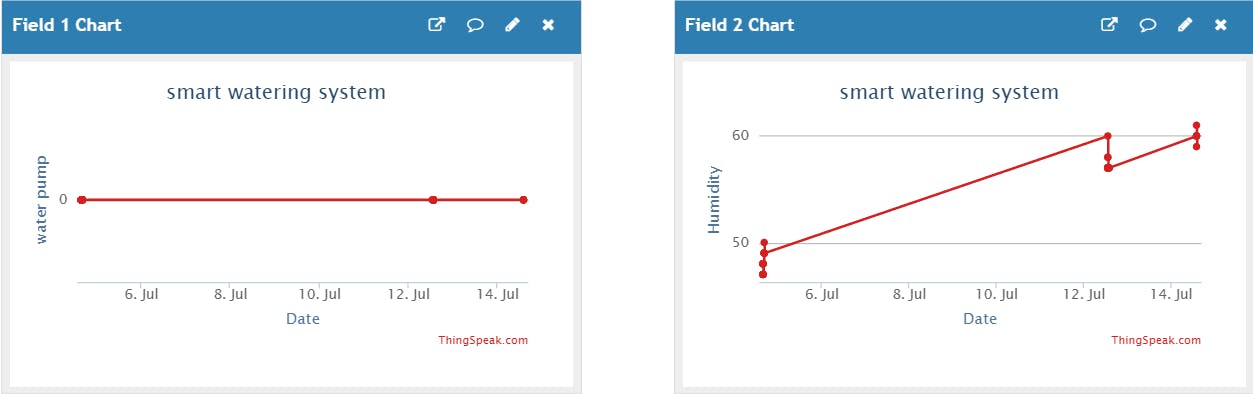
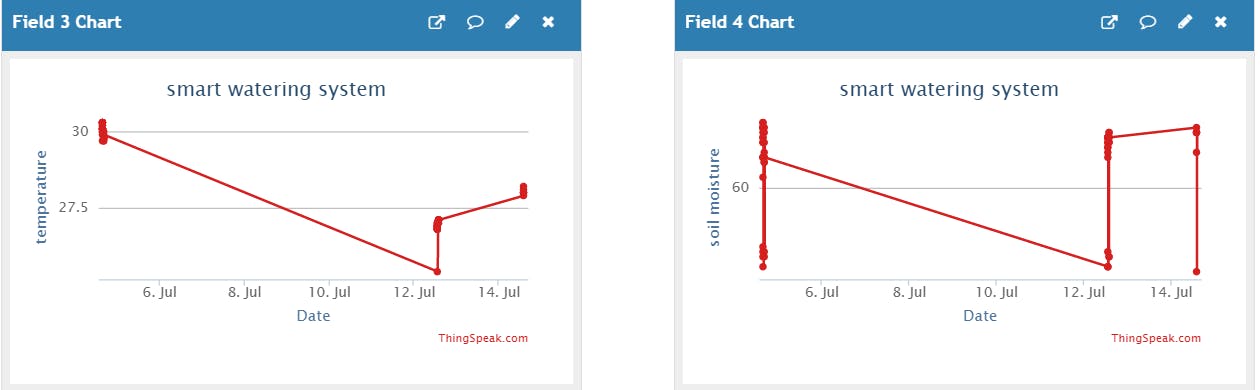
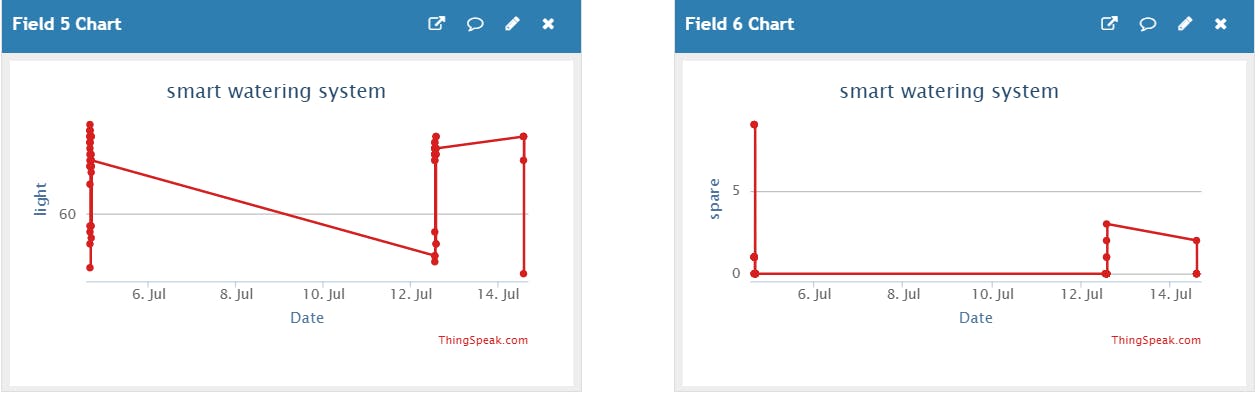
Server side of smart watering system
Here we have used Thingspeak cloud platform in order to connect the hardware device to our android application so that we could monitor the plant parameters and control the actuators remotely. The input data sent from the sensors is visually represented on the Thingspeak platform as shown in below fig.
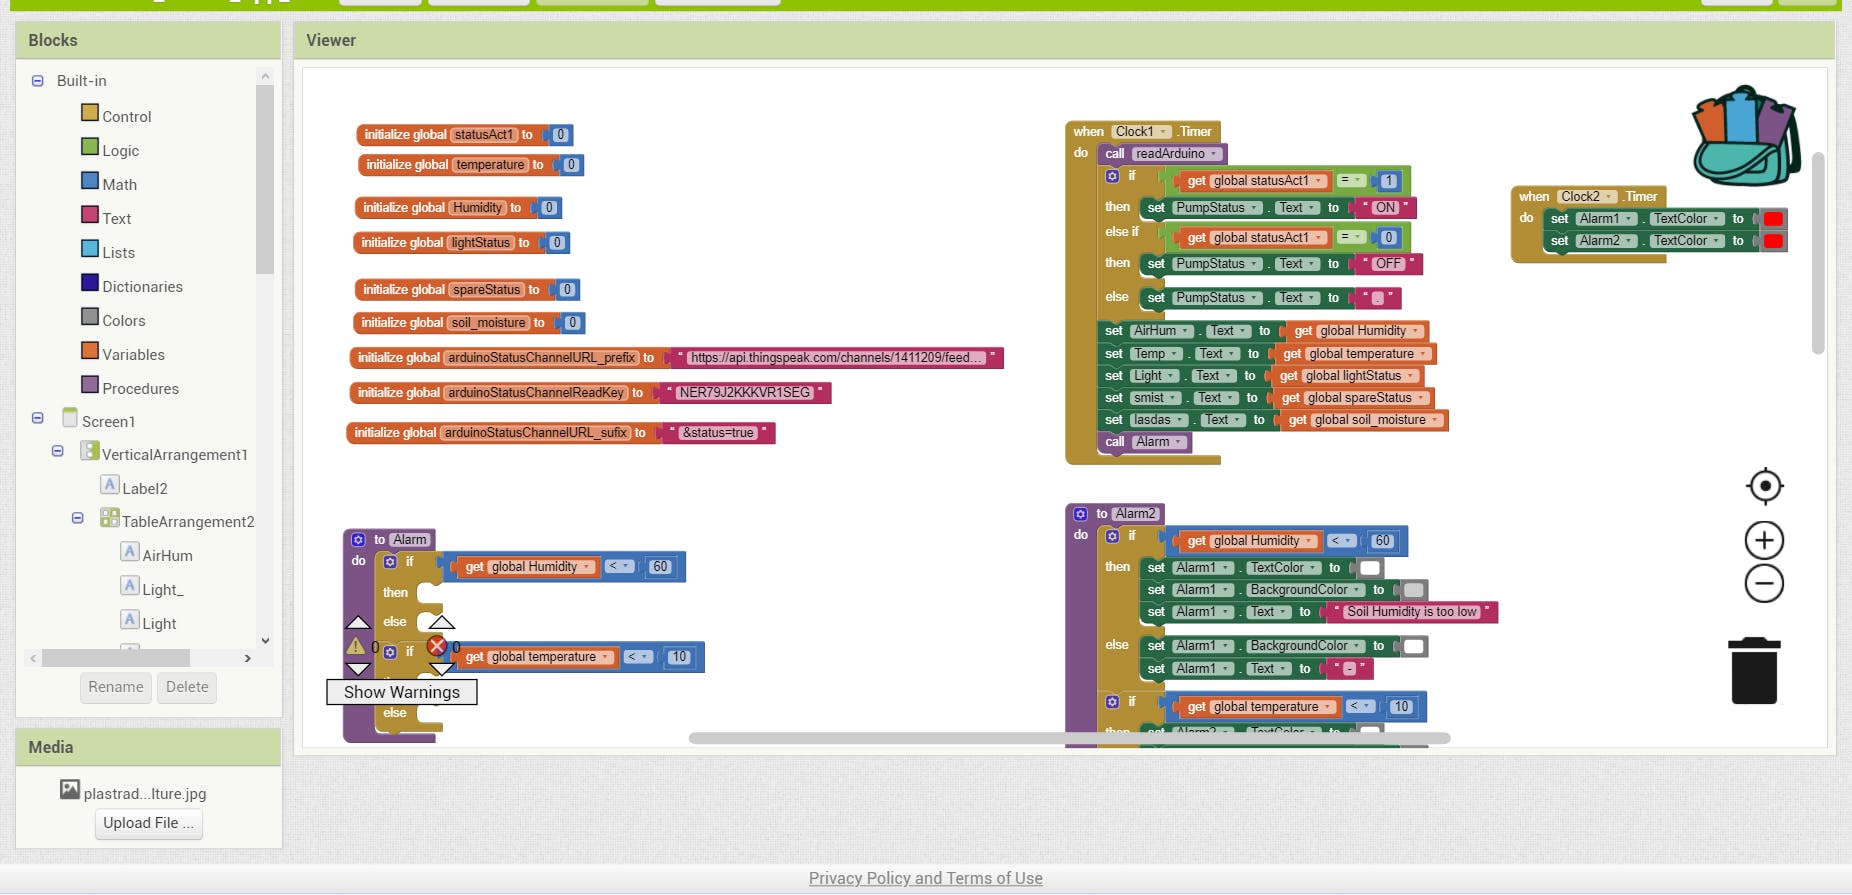
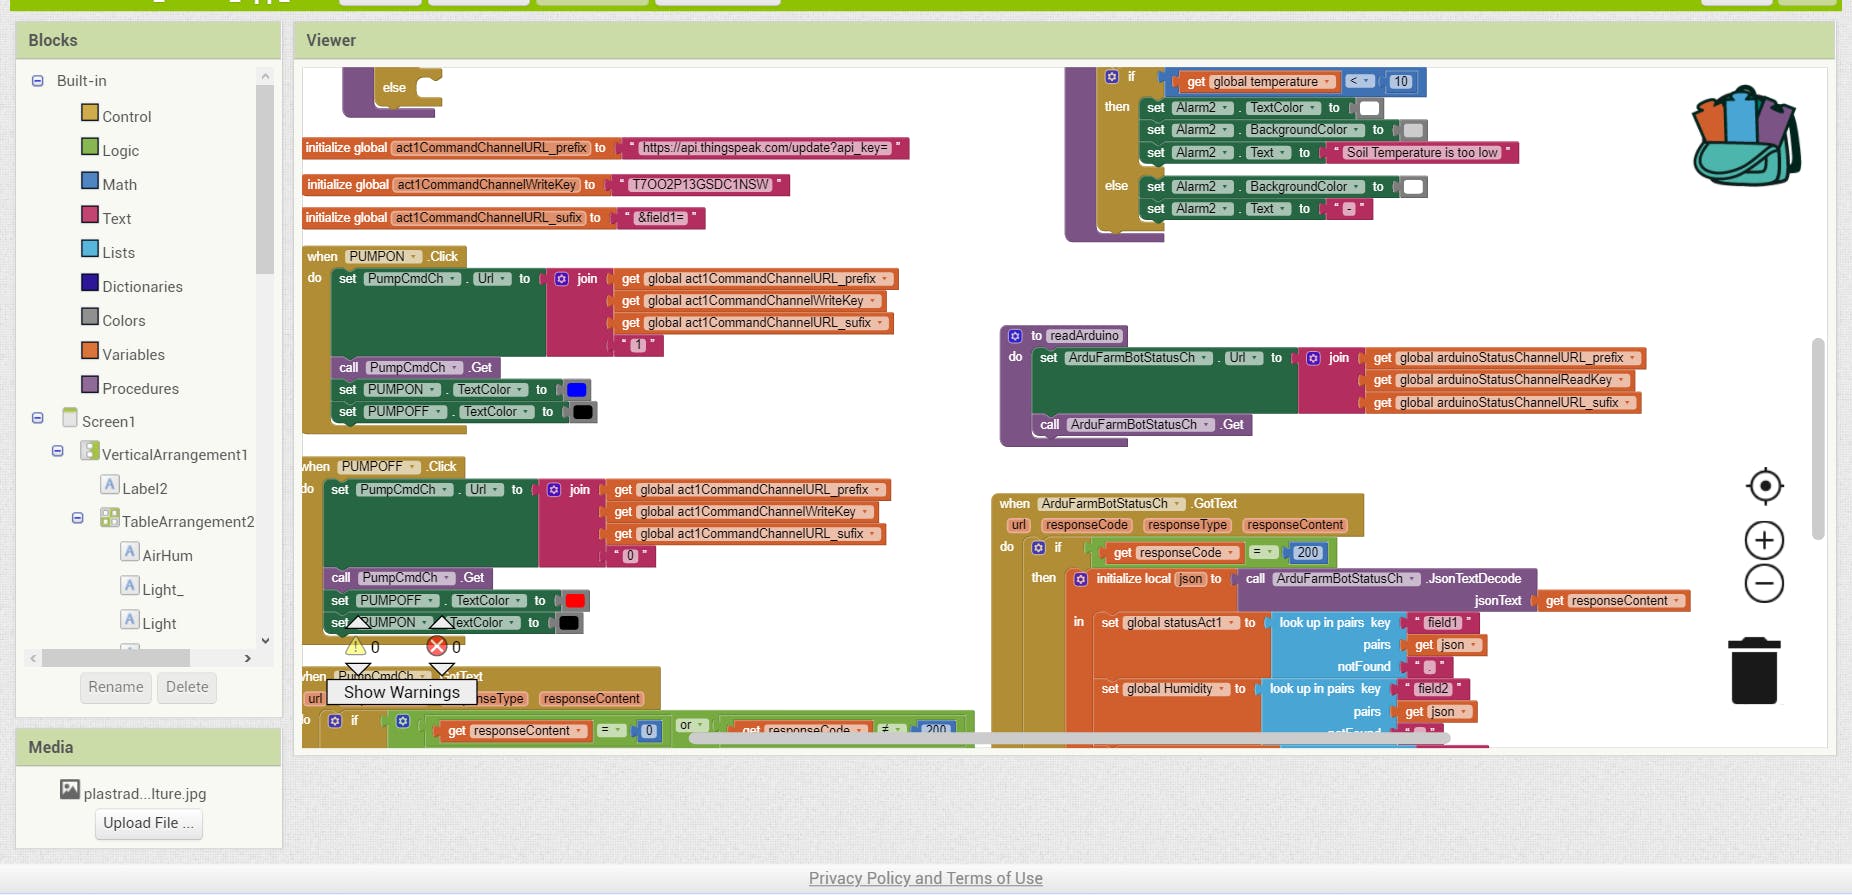
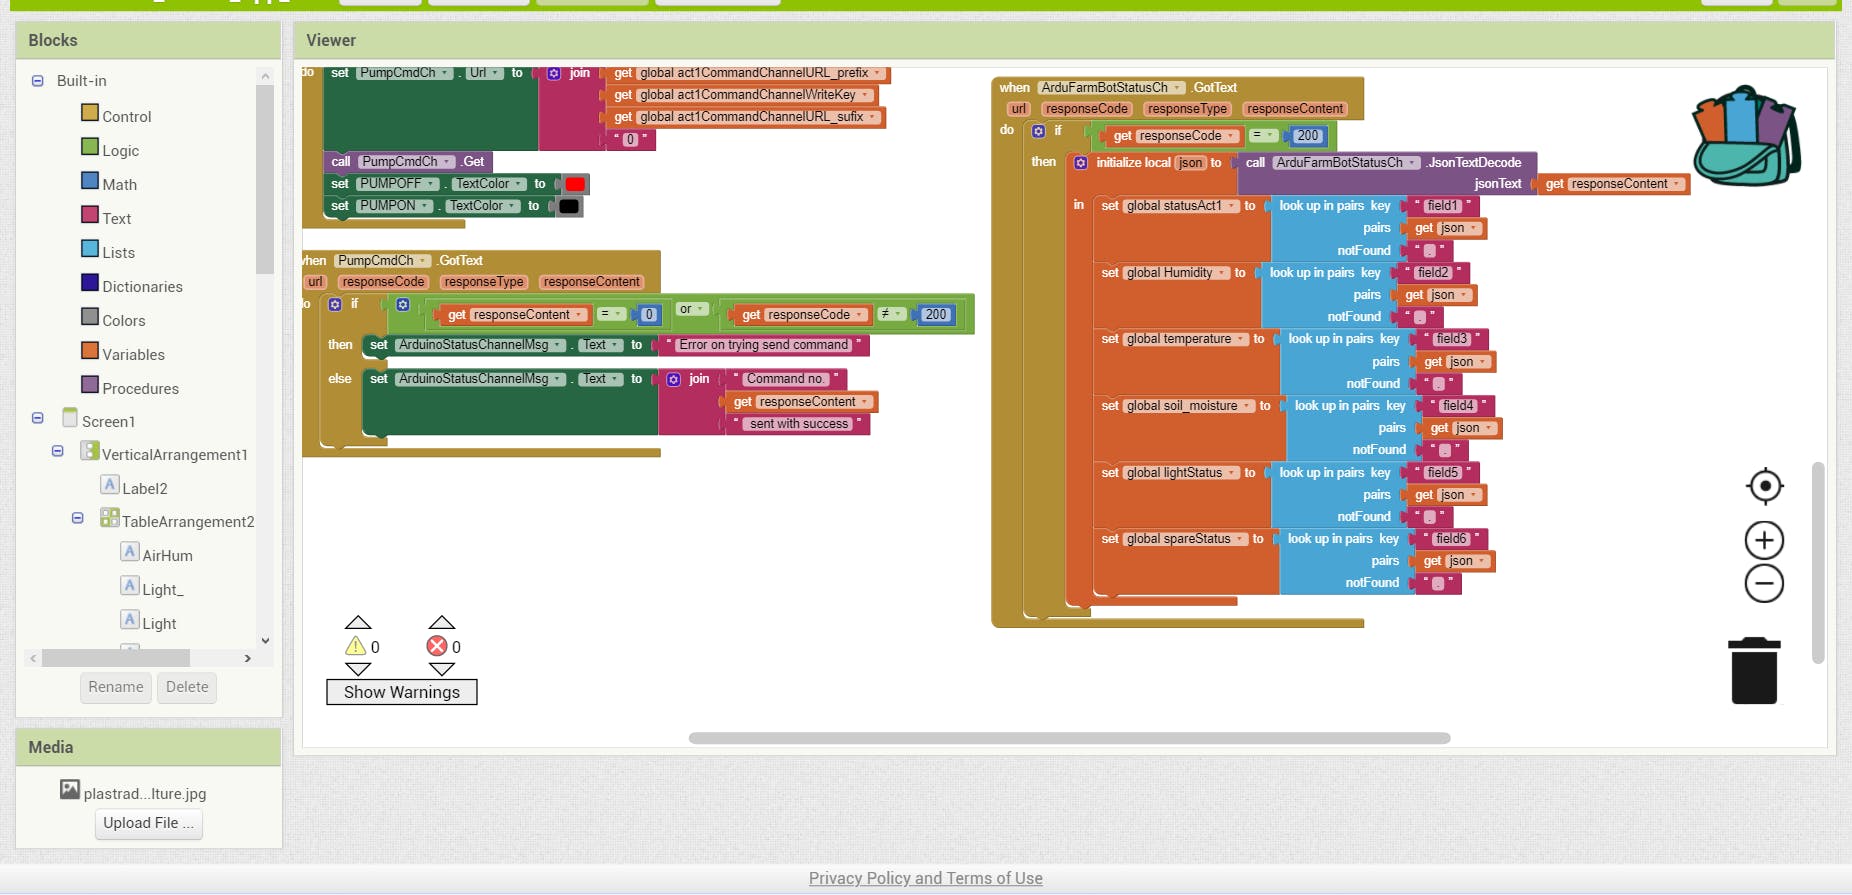
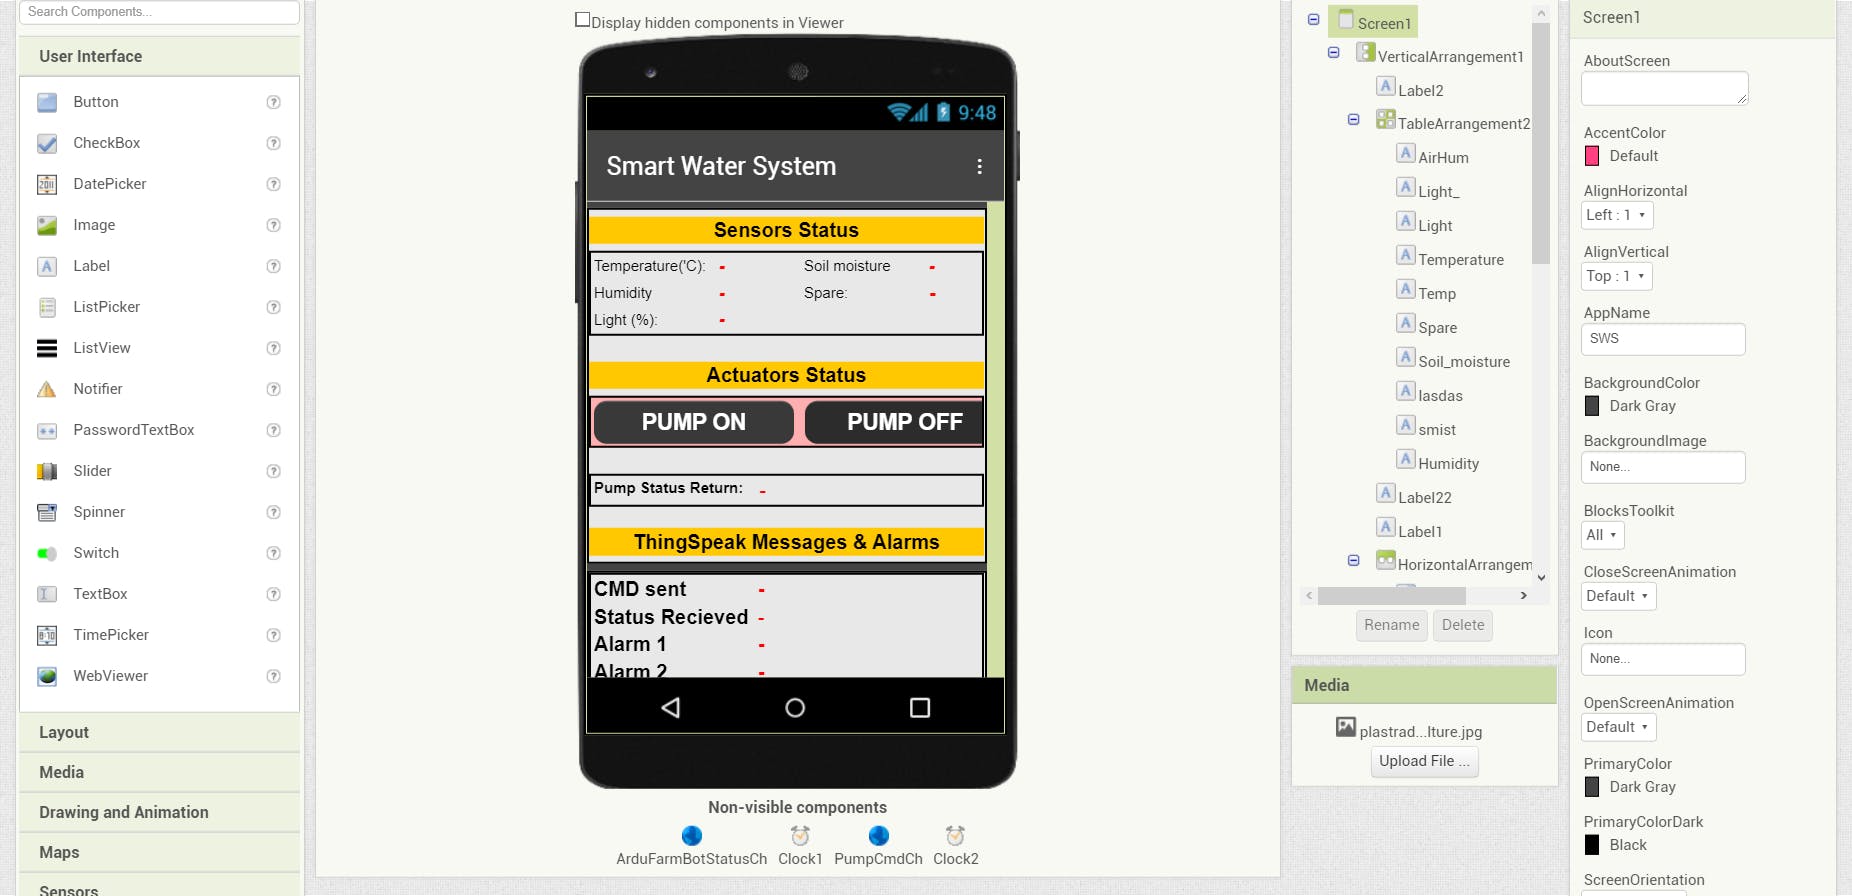
Android Application
I have used MIT appinventor to develop the android application shown in below fig.